Defining Factors in Sealing Applications
While small in cost, seals are often one of the most important components in a product.
Seals must be carefully designed and produced to ensure superior product performance. This section provides a review of the issues that need to be considered when making sealing decisions.
All sealing applications fall into one of three categories:
- those in which there is no movement
- those in which there is linear motion or relatively slow rotation, or
- those involving high speed rotation.
A sealing application in which there is no movement is termed a static seal. Examples include the face seal in an end cap, seals in a split connector, and enclosure cover seals.
A sealing application in which there is linear motion (reciprocation) or relatively slow rotation or oscillation, is termed a dynamic seal. Applications involving slow rotation or oscillation are classified as a dynamic application if the surface speed is less than 50 fpm (15 meters/min).
Finally, a sealing application in which there is high speed rotation, is termed a rotary seal. Applications are classified as a rotary application if the surface speed is greater than 50 fpm (15 meters/min). It should be noted that both the seals and grooves used for dynamic and rotary applications are different in design and specification. These differences are explained in the following sections.
Seal Orientation and Type
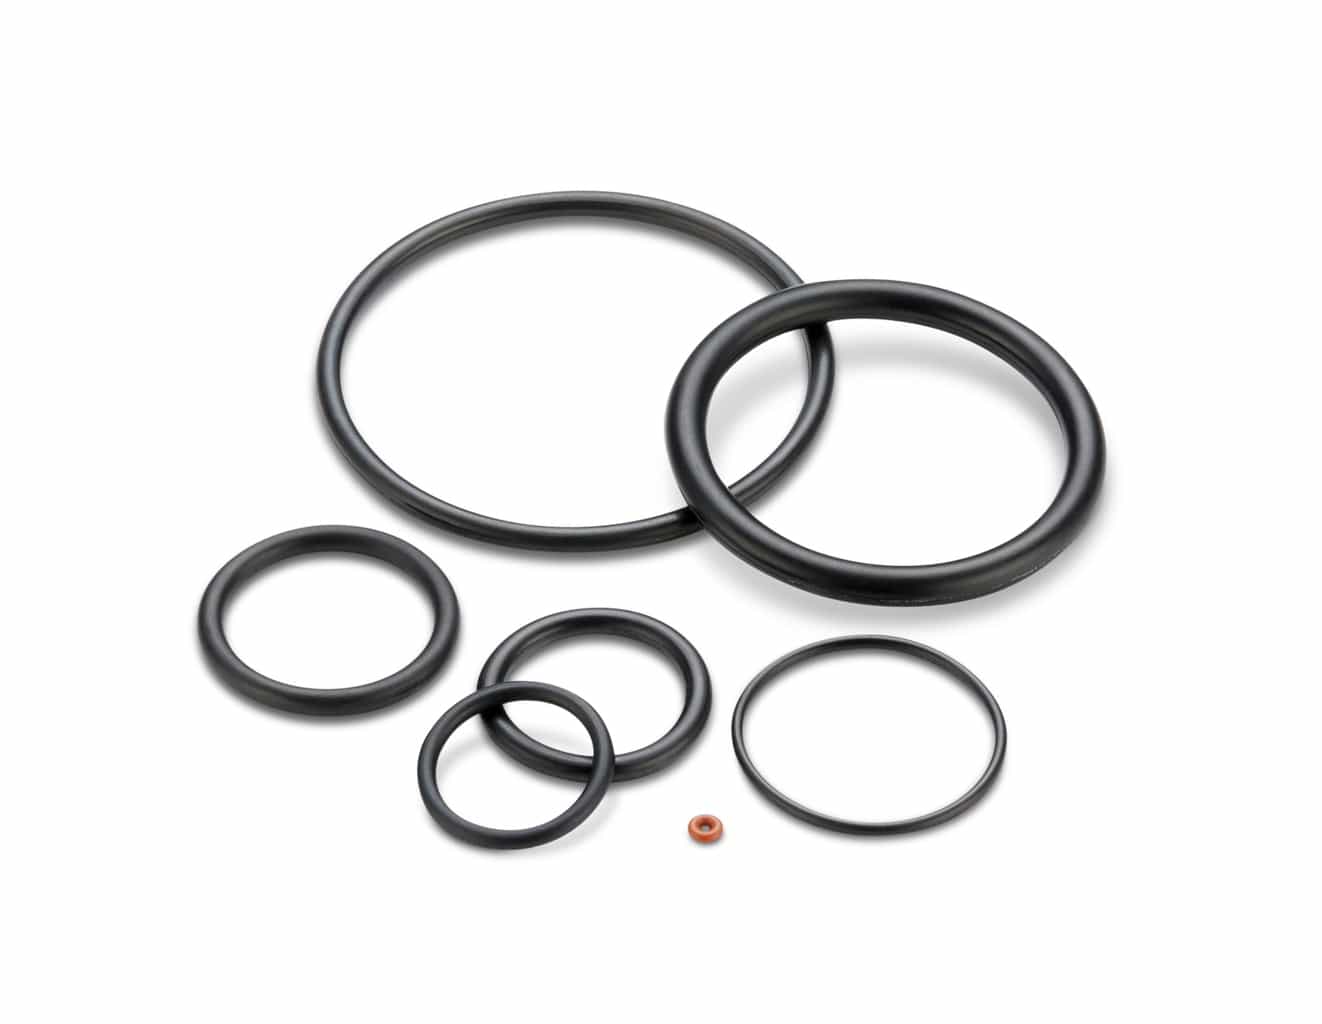
Quad-Ring® Brand and O-Ring seals can be oriented such that the seal compression, and therefore the sealing, is occurring in either a radial or axial direction. This is illustrated above. In the case of a radial seal, the primary sealing surface can occur at either the ID or the OD of the seal, with the common names for these seals being a rod seal and a piston seal respectively. An axial seal is commonly referred to as a face seal. Each of these seal types can be either a static, dynamic, or rotary seal, with the exception of a piston seal which is generally not recommended for a rotary application.

Surface Finish
Shorter than expected seal life is usually the result of too fine a finish on either the rod or the cylinder bore. A highly polished (non-porous) metal surface does not retain the lubricant necessary to control friction, whereas a rough or jagged surface will abrade the seal and lead to early seal failure.
To avoid these problems, we recommend an ideal surface finish of 20-24 µin (0.5-0.6 µm) Ra, with an acceptable range of 20-32 µin (0.5-0.81 µm) Ra. The surface finish should never be finer than 16 µin (0.4 µm) Ra.
Pressure Energized Seals
It is more difficult to seal at low pressures than at high pressures. As pressure acts against a seal, the rubber material is deformed. With proper seal design, deformation can improve the seal. This concept is used in many seal designs. By adding seal beads or pressure intensification details to the seal, sealing improvements can be made to custom designs. For very low pressure or vacuum applications we recommend using a Quad-Ring® Brand seal over an O-Ring.
Friction
The functional life of a seal is affected by the level of friction to which it is exposed. Factors contributing to friction include seal design, lubrication, rubber hardness (the standard rubber hardness for most sealing applications is 70 durometer Shore A), surface finish, temperature extremes, high pressure and the amount of squeeze placed on the seal.
The use of “slippery rubber” compounds can help lessen friction and improve seal life. Surface coatings and seal treatments such as PTFE and molybdenum disulfide are also used to reduce seal friction.
It is difficult to accurately predict the seal friction which will be present in an application, given the many variables involved. When designing an application which will be sensitive to seal friction, testing will probably be required to determine the effect of seal friction.
Component Concentricity and Roundness
When evaluating an application, remember that components are not perfectly concentric or round. Concentricity and roundness can also change with changes in pressure and temperature. When sizing a seal, consider the worst case scenario for your application and make sure that the seal system you select will work in the worst case scenario.
If, after reviewing the calculations on your application, you find that seal integrity may be compromised when dimensions approach a worst case scenario, consider making the following adjustments before recalculating:
- Reduce the clearance between components.
- Reduce the tolerances of the components.
- Use a larger cross section seal to absorb the extra tolerance.
- Increase the seal squeeze (which will also increase friction).
- Improve component alignment and support to reduce the eccentricity.
Seal Installation – Avoiding Damage
Seals can be easily damaged during installation. For example, a seal is often inserted onto a shaft by sliding it over a threaded surface. To avoid seal damage reduce the rod diameter in the threaded region. Also include a lead in chamfer for the seal and avoid sharp corners on grooves.

Peripheral Compression
In certain applications, such as with a rotary seal, the seal size is selected and the seal groove is designed such that the free-state diameter of the seal ring is larger than the groove diameter. Upon installation, the seal will be compressed by the groove to a smaller diameter. This is called “placing the seal under peripheral compression”, or simply “peripheral compression.”
Peripheral compressed seals are used in rotary applications to prevent heat-induced failure of the seal due to material contraction. They are also used in face seal applications when sealing a positive internal pressure. It should be noted that a peripherally compressed seal does not experience installed stretch, since the seal is being compressed rather than stretched during installation.
Percentage Gland Fill

Since rubber can generally be regarded as an incompressible material, there must always be sufficient space in the seal gland for the seal. When there is insufficient space for the seal, application problems including high assembly forces and seal and unit failure can occur. The ratio of seal volume to gland volume, which is frequently termed “gland fill” or less formally as “groove fill”, is usually expressed as a percentage of the gland which is occupied by the seal. It is always desired to keep this percentage less than 100% under all application conditions and extremes of tolerance. To allow for a margin of safety, a good practice is to design to a maximum gland fill of 90% or less.
The gland fill can be easily determined by calculating the cross-sectional area of the seal and dividing it by the cross-sectional area of the gland. The cross-sectional area of the gland is its height times its width. The equations for the cross-sectional areas of an O-Ring and a Quad-Ring® Brand can be found on here. When calculating the maximum gland fill, always use the worst-case tolerance situation which results in the smallest gland and largest seal.
Cross Section Size
In applications in which the area to contain the seal is small, it is important to remember that smaller cross-section seals require much tighter tolerances on mating parts. Small cross-section seals cannot handle the large variation in part sizes, imperfections like scratches, and high pressure.
Installed Seal Stretch and Cross-sectional Reduction
Installed seal stretch is defined as the stretch experienced by a seal ring following installation into the seal groove. As a seal ring is stretched, there is a resulting reduction in the seal’s cross-section. This reduction in cross-section will reduce the squeeze on a seal, which has the potential to create sealing problems, especially when using smaller diameter seal rings. To minimize the occurrence of cross-sectional reduction, a general “rule of thumb” to follow is to keep the installed seal stretch less than 3%. It should be noted that with standard seal sizes smaller than an -025 seal, the installed seal stretch will frequently be higher than 3%, even with a properly designed groove. In these situations, care should be taken to properly control component tolerances to prevent insufficient seal squeeze from occurring at the extremes of component tolerance. If necessary, component tolerances should be tightened to ensure an acceptable seal is obtained.
Seal Extrusion
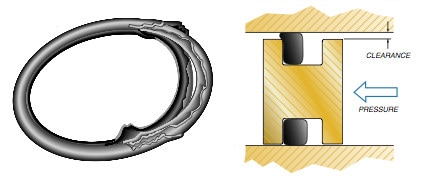
Extrusion is a common source of seal failure in both static and dynamic applications. The O-Ring illustrated failed when it was extruded from the groove. Part or all of the seal is forced from the groove by high continuous or pulsating pressure on the seal. If left uncorrected, the entire cross-section will eventually disintegrate.
Follow these easy rules to minimize the risk of seal extrusion:
- Choose a seal configuration and material designed to withstand the anticipated pressure.
- Make sure the clearance between adjacent surfaces is appropriate for the hardness of the material. Clearance should be minimized and must not exceed recommended limits for the rubber hardness.

Anti-Extrusion (Back-up) Rings
The use of a back-up ring with an O-Ring or Quad-Ring® Brand seal can minimize or prevent the occurrence of seal extrusion in applications with higher pressure or higher than desirable clearance. Spiral-wound or washer-shaped back-up rings are installed next to the seal opposite the pressure side of the application. Back-up rings are recommended for applications with pressures in excess of 1500 psi.
Although back-up rings can be made from any material which is softer than the shaft, they are commonly made from poly-tetrafluoroethylene (PTFE), which provides low friction. PTFE back-up rings are available as solid rings, single-layer split rings, and two-layer spiral-wound split rings. Two-layer spiral-wound PTFE rings provide easy installation, protect the seal from damage, and are the recommended type. When using a back-up ring, always increase the seal groove width to account for the thickness of the back-up ring.
Seal Groove Design Equations
The equations on this page are used to calculate the different parameters of a seal groove. They are used in the explanations and the examples on the following pages.
INSTALLED SEAL STRETCH
Equation 1
Percent Stretch = ((Installed Seal ID – Original Seal ID)/ Original Seal ID) x 100
SEAL CROSS-SECTIONAL COMPRESSION (SQUEEZE)
Equation 2
Percent Compression = (1 – (Gland Radial Width/Seal Cross-Section)) x 100
Equation 3
Max Percent Compression = (1 – (Min Gland Radial Width/Max Seal Cross-Section)) x 100
Equation 4
Min Percent Compression = (1 – (Max Gland Radial Width/Min Seal Cross-Section)) x 100
SEAL PERCENT GLAND FILL
Equation 5
Percent Gland Fill = (Seal Cross-sectional Area/(Gland Depth X Groove Width)) x 100
Equation 6
Max Percent Gland Fill = ( Max Seal Cross-sectional Area/(Min Gland Depth X Min Groove Width)) x 100
SEAL CROSS-SECTIONAL AREA
Equation 7
O-Ring Cross-sectional Area = (O-Ring
Cross-section/2)2 x 3.1415
Equation 8
Quad-Ring® Brand‚ Cross-sectional Area = (Quad-Ring® Brand Cross-section)2 x 0.8215
(Note the intentional absence of the division term in the Quad-Ring® Brand formula)
The maximum value for seal cross-sectional area can be obtained by using the maximum seal cross-section size (nominal size + tolerance) in Equations 7 and 8.
The following table provides the nominal and maximum seal cross-sectional areas for the standard seal cross-section sizes. This table can be used for quickly computing the percent gland fill.
| O-Ring Cross-sectional Area (in2) | Quad-Ring® Brand Cross-sectional Area (in2) | |||
|---|---|---|---|---|
| Seal Cross-section | Nominal (in2) | Maximum | Nominal | Maximum |
| 0.070 ±0.003 | 0.00385 | 0.00419 | 0.00403 | 0.00438 |
| 0.103 ±0.003 | 0.00833 | 0.00882 | 0.00872 | 0.00923 |
| 0.139 ±0.004 | 0.01517 | 0.01606 | 0.01587 | 0.01680 |
| 0.210 ±0.005 | 0.03464 | 0.03631 | 0.03623 | 0.03797 |
| 0.275 ±0.006 | 0.05940 | 0.06202 | 0.06213 | |
CHART WON’T COPY CORRECTLY – from here or from the live page: O-Ring Cross Sectional Area
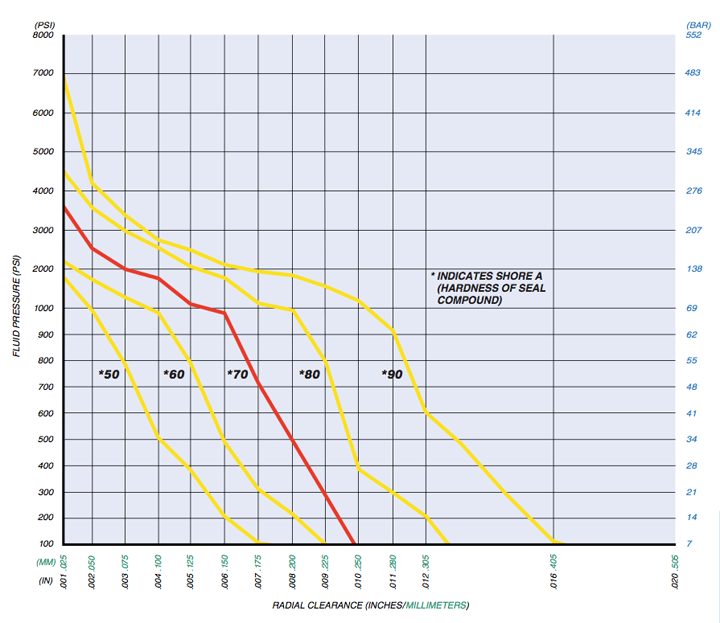
Recommended Radial Sealing Clearances for Quad-Ring® Brand and O-Ring Seals
This chart indicates the maximum permissible radial clearance as a function of application pressure and the seal rubber hardness.

Notes
- This chart has been developed for seal cross-sections of 0.139″ and larger. Smaller cross-section seals require less (tighter) clearance.
- This chart is for applications in which the piston and bore are concentric. Radial clearance must be reduced in those applications with severe side loading or eccentric movement.
- The data in this chart are for seals which are not using anti-extrusion back-up rings.
- The data in this chart are for seals at room temperature. Since rubber becomes softer as temperature increases, clearances must be reduced when using seals at elevated temperatures.
- The maximum permissible radial clearance would include any cylinder expansion due to pressure.