Gates
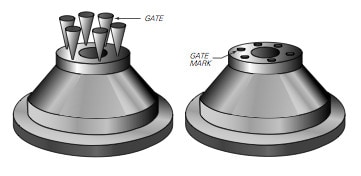
Transfer and injection molds typically feature multiple gates to ensure even flow of the material into the cavity.
These gates range in diameter from 0.010 – 0.150 (0.254 – 3.81mm), placed at intervals along the circumference of the cavity. Gate diameter and location are determined by our Engineering Department in conjunction with the customer so as not to hinder part function.

A raised spot or small depression, called a gate mark or sprue mark, can be seen on the surface of the finished part where the gates interface with the cavity.
| Material Durometer | Typical depression or projection from surface of part |
|---|---|
| less than 50 | 0.015 (0.381 mm) |
| 50 or more | 0.007 (0.178 mm) |