Quad® Brand Ground Rubber Balls
Rubber balls from Minnesota Rubber and Plastics are carefully molded and precision ground for superior performance in the most critical applications.
Material
Our standard rubber balls are molded from a 70 Shore A nitrile compound specially formulated for grinding. Our compound 525K is recommended for most typical
pneumatic, hydraulic or water applications.
Other elastomeric compounds are also available for more demanding situations such as steam, high temperatures or corrosive fluids. Compounds with a hardness lower than 70 Shore A are difficult to grind. Harder materials are also available.
Sphericity
High speed centerless grinding combined with automatic gauging/measuring equipment assures you of a consistent, close tolerance on both spherical and diametric dimensions. The resulting uniform finish also ensures consistent sealing performance regardless of how the ball seats.
Variety of Sizes
Select from our standard sizes below, or take advantage of our custom molding facilities for your specialized ball applications.
| Part No. | Compound | Nominal | Diameter (in) | Diameter (mm) |
|---|---|---|---|---|
| B130093 | 525K | 3/32 | 0.093 ±0.003 dia., 0.003sph. Total | 2.36 ±0.08 dia., 0.08sph. Total |
| B130125 | 525K | 1/8 | 0.125 ±0.003 dia., 0.003sph. Total | 3.18 ±0.08 dia., 0.08sph. Total |
| B130156 | 525K | 5/32 | 0.156 ±0.003 dia., 0.003sph. Total | 3.96 ±0.08 dia., 0.08sph. Total |
| B130187 | 525K | 3/16 | 0.187 ±0.003 dia., 0.003sph. Total | 4.75 ±0.08 dia., 0.08sph. Total |
| B130218 | 525K | 7/32 | 0.218 ±0.003 dia., 0.003sph. Total | 5.54 ±0.08 dia., 0.08sph. Total |
| B130250 | 525K | 1/4 | 0.250 ±0.003 dia., 0.003sph. Total | 6.35 ±0.08 dia., 0.08sph. Total |
| B130312 | 525K | 5/16 | 0.312 ±0.003 dia., 0.003sph. Total | 7.93 ±0.08 dia., 0.08sph. Total |
| B130375 | 525K | 3/8 | 0.375 ±0.003 dia., 0.003sph. Total | 9.53 ±0.08 dia., 0.08sph. Total |
| B130437 | 525K | 7/16 | 0.437 ±0.004 dia., 0.005sph. Total | 11.10 ±0.10 dia., 0.13sph. Total |
| B130500 | 525K | 1/2 | 0.500 ±0.004 dia., 0.005sph. Total | 12.70 ±0.10 dia., 0.13sph. Total |
| B130562 | 525K | 9/16 | 0.562 ±0.004 dia., 0.005sph. Total | 14.28 ±0.10 dia., 0.13sph. Total |
| B130625 | 525K | 5/8 | 0.625 ±0.004 dia., 0.005sph. Total | 15.88 ±0.10 dia., 0.13sph. Total |
| B130750 | 525K | 3/4 | 0.750 ±0.004 dia., 0.005sph. Total | 19.05 ±0.10 dia., 0.13sph. Total |
| B131000 | 525K | 1 | 1.000 ±0.004 dia., 0.005sph. Total | 25.40 ±0.10 dia., 0.13sph. Total |
Ground Ball Tip Sheet
- Solid, non-reinforced core ground balls are generally used as check devices for pressures less than 120 psi.
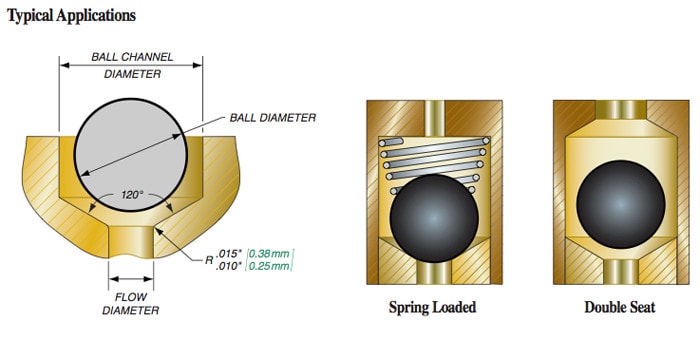
- When designing an application to incorporate a check ball, the differential area between the projected ball area and the area of the ball channel should be slightly greater than that of the main flow area. This will minimize flow disruption due to the presence of the ball in the flow stream.
- The ball seat should have an included angle of 120° and have a 0.010″-0.015″ radius where the seat and the flow channel meet. For liquids, the ball seat should have a surface finish of 20µin RMS or better. For air or vacuum applications, the ball seat should have a surface finish of 10µin RMS or better.
- At pressures greater than 120 psi, there is a tendency for ground balls to become stuck in the ball seat (checking orifice). If this occurs often, it can damage the ball, eventually causing the ball to extrude through the orifice.
- As a “rule-of-thumb,” the diameter of a check ball should be at least three times the diameter of the flow orifice. The larger the ball-to-orifice ratio, the lower the likelihood of ball extrusion.
- Standard tolerances for ground balls are indicated in the following table:
| Ball Diameter | Diameter Tolerance | Sphericity |
|---|---|---|
| < 0.375 | ±0.003 | 0.003 Total |
| > 0.375 | ±0.004 | 0.005 Total |
